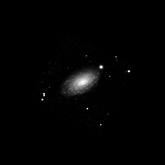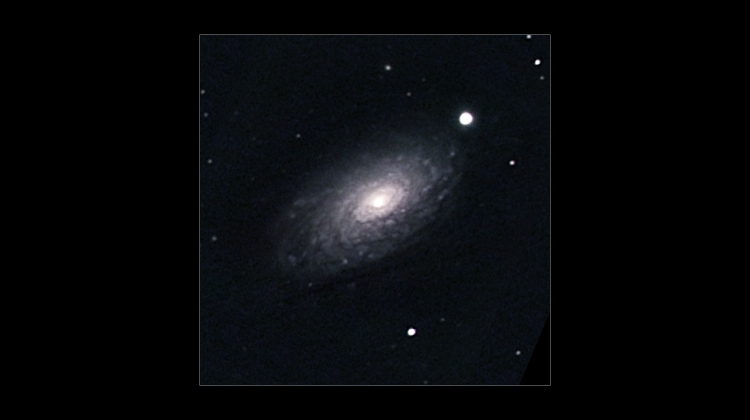
M63 has a wealth of detail in reach of an entry-level camera (like the Meade Deep Sky Imager). The tight spiral arms, with their bright star-forming regions, look like the coils of a sunflower. Make sure that you stack lots of exposures and have a sharp focus—the detail in the arms is easily lost in any background noise.
Capturing M63
You can find M63 near M51 in the sky and both are part of the same galaxy group. I usually start at η (eta) Ursa Majoris (the last star in the handle of the Big Dipper) and move south-west on the map, past M51. M63 is visible as a fuzzy star in the DSI's live image at 1 second per exposure. As always, you will need to adjust the histogram bars to see as many stars as possible.
I used an 8" Schmidt-Newtonian at f/4 for my image. With the DSI this will result in an image roughly 220 pixels across, which is sufficient to see a lot of detail. For the best result, stack as many images as you can, but no less than 120 minutes worth.
Practice on M51 before tackling M63—the Whirlpool Galaxy can be captured more easily. But don't try to capture both M51 and M63 on the same night—each deserves a lot of exposures.
Processing the Image
The two major operations for processing are going to be histogram stretching and image sharpening. The arms are very faint and you will need to stretch the histogram to see them. In Photoshop, start by using the Levels command to bring up the black level and to bring out the arms, but stop before the core gets overexposed. Next, use the Curves command to continue stretching. If necessary, use a Layer Mask to stretch the arms but not the core. Finally, you may want to remove any remaining skyglow by applying a flat-frame or manually subtracting a skyglow frame.
Once you have a revealed as much of the faint detail as possible, it is time to sharpen the image. First I copied the Green channel to the Blue channel because the Blue channel is generally noisier (if you have enough exposures, this will be less of a problem). Next, I desaturated the image to obtain a single grayscale image (but don't throw away the previous color version—at the end we will apply the color to the sharpened grayscale image).
Use Filter/Sharpen/Unsharp Mask to bring out more detail. Increasing the Radius will sharpen larger features in the image and is less likely to increase noise. But if the Radius is too large, then the image will lose resolution. A good compromise is generally 1.5 to 2.5.
With all the detail in M63 I am usually tempted to sharpen heavily, but this can give an image the unpleasant look of over-digitization. To compensate, I take a less-sharp previous image (or even a blurred version) and paste it as a layer on top of the sharp image. Then I select Screen mode for the new layer and adjust the Opacity until the image is pleasing. This gives the image a subtle glow while still preserving the sharp features.
Another trick that works is to selectively sharpen the bright parts of the image (for example, the core) while leaving the fainter parts alone.