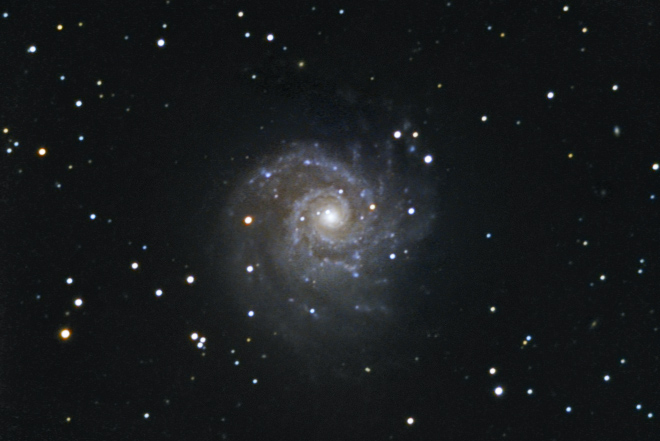
M74 is a beautiful face-on spiral. Though not as big as M101 or a bright as M51, this large spiral shows a wealth of detail, particularly in its faint, diffuse arms.
Capturing M74
M74 is notoriously difficult to capture. You need to expose for a long time to boost M74's weak signal above the noise. Fortunately, finding the galaxy is not too hard: M74 is just 1½° away from Eta (η) Piscium. At 1 second integrations I could see a very faint smudge with a very dim nucleus.
I used my LXD75 SN8 at f/4 to capture the image. I stacked one-minute sub-exposures for the luminance because that is the best I can do without guiding. Even then, only about half the exposures were usable. If your skies and your mount allow it, try two or three minute subs. Note that there is always a trade-off: longer sub-exposures can bring out fainter elements, but any mistakes in guiding will result in a fuzzier image.
Regardless of the length of each sub, make sure you capture enough of them. At minimum, make sure you can make out the faint parts of the galaxy's arms. After four hours of luminance, I had enough to process, but it would have been a lot easier if I had eight hours!
For the color, I stacked two-minute sub-exposures. Shooting through a filter means less light reaches the camera so I needed to increase my exposure time. Fortunately, since all the detail comes from the luminance, I don't have to worry if the color exposures are a little streaked or fuzzy. I captured about an hour per channel of color, which was just barely enough for this target.
Processing the Image
Many of the interesting elements of M74 are in its dim arms. Processing the luminance is an exercise in bringing out those faint elements above the background noise.
The first thing I did (after a standard histogram stretch) was to eliminate the background gradient as much as possible. I'm too lazy to use flats, so I processed the gradient by hand. I manually created some gradients to compensate for the sky background. Then I filled-in any remaining patches.
Once I had a flat background, I enhanced the galaxy itself. I isolated the various zones (background, dim area, bright area) and processed each one separately. For the dim area, I used a combination of the Dust & Scratches filter and a Gaussian blur. Personally, I don't like how Dust & Scratches leaves the image; it appears too processed to my taste. To compensate, I blended some of the unprocessed image in and added a tiny bit of Gaussian noise. Yes, it seems counter-intuitive to try to add noise to a noisy area. But the goal is actually to replace the ugly, irregular noise in your image with a more regular (and more pleasing) Gaussian noise. Don't overdo it, though.
The hardest part was processing the color. I barely had enough data, so I had to make many sacrifices. I followed this process:
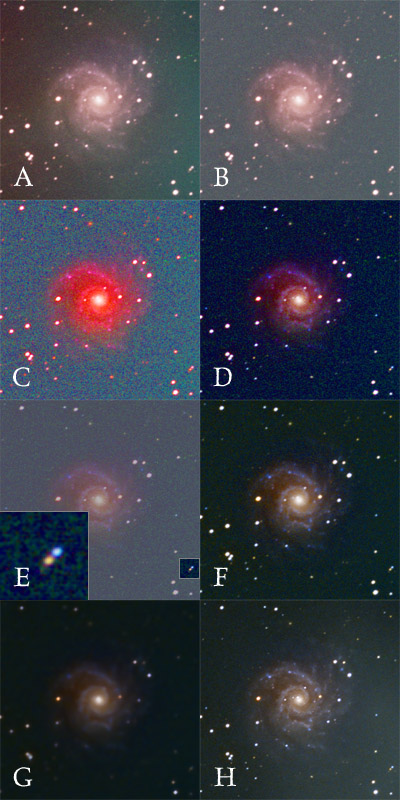
I started by stacking the color channels together (Figure A). I used Penumbra, of course, but any stacking program will work as well (or better!). Notice that there is an awful gradient: the left side of the sky is red while the right side is green. To fix that, I removed the sky gradient from each channel. I used the same techniques for fixing the gradient in a luminance image. Figure B shows the result.
The captured color is very subtle and faint. To help me see the color better I used an Adjustment Layer in Photoshop to increase the saturation dramatically (Figure C). Looking at the result, it is clear the red channel is too bright.
I used a combination of Curves and Level to adjust the red channel so it matched the others. The color changes are very sensitive, so use very shallow curves. The result is in Figure D.
I used the stars in the image as a guide to know how much to alter the red channel. In Figure E you can see two stars, one red and one blue. I used those stars to help me adjust the channels. As long as the two were of the proper color, I knew I was heading in the right direction. It's better to use stars rather than galaxy features, because bright stars will show better color.
Next I used the Channel Mixer to make more subtle adjustments to the color. Compare Figure D to Figure F. In D, the galaxy's core is too red. To compensate I used the Channel Mixer to add some of the green and blue channels to the red channel. Processing color is more art than science. Experiment and see what you can do.
Finally, I used the Dust & Scratches filter to remove noise (Figure G). Since we're applying the color to a sharp luminance image it doesn't matter if the color channel is blurry. Once you apply the color to your already processed luminance image (Figure H) your image will suddenly come to life!